
![]()
The information below is a summary only.
You can access a Quick Reference Guide (downloadable PDF version) and the full Garmin inReach Mini User Guide on the Training and Learning Support pages.
In addition, you’ll find links to the Garmin website for everything you need to know about the units, including battery life under different conditions.
As part of a phased implementation, DEECA Fire Tower Lookout Observers (FLOs) were the first to receive Garmin inReach Mini units in mid-December 2021.
As of May-2022, units are being delivered that support sending pre-set Starting my activity, Checking-in and Checking-out messages.
You can request a Garmin Mini (II) GPS device by contacting the FFMVic Support Team: Service Desk Portal
Select FFMVic Apps Support » FFMVic Application List » JourneyMate (Garmin) » Request a Garmin Mini GPS device
NB: You will need your business unit charge code to complete the form (and details/permission of the financial delegate if that is not you), the ongoing monthly subscription costs will be the responsibility of your business unit, there is no charge for the device itself. The devices are activated on the Garmin Advanced Professional plan, current monthly subscription cost is AUD$55.
Click here for instructions on how to use the Garmin Mini to check in with JourneyMate.
On this page:
- Privacy of data
- Unboxing and fitting the clip-on carabiner & spine-mount adapter
- Switching it on / off
- Keys
- Test the device
- Acquiring GPS satellite signals
- Test the reception
- Initiate an SOS rescue
- Send a custom SOS message
- Cancel an SOS rescue
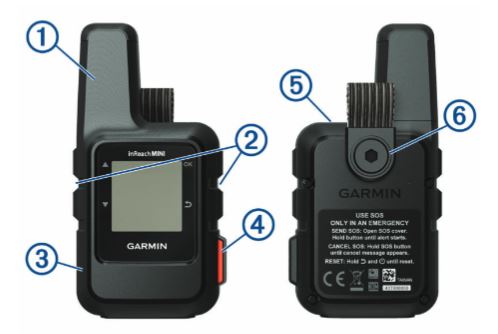
Garmin inReach Mini
Privacy of data
When it is switched on, your location is updated by the Garmin Mini regularly ~ this information will only be used to enable assistance to be directed to you in an emergency.
Unboxing and fitting the clip-on carabiner & spine-mount adapter
Watch the video for instructions.
Switching it on / off
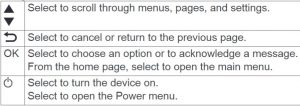
Press the ![]() key.
key.
Keys
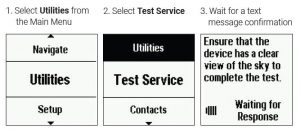
Test the device
| Note: | The Garmin needs to connect to overhead satellite(s). Stand in a location that provides a clear, direct sight of the sky. |
From the main menu, select Utilities > Test Service > OK.
Use the ![]() buttons to move through the menu options.
buttons to move through the menu options.
Wait while the device sends a test message.
When you receive a confirmation message, your device is ready to use.
Acquiring GPS satellite signals
Once on, the GPS receiver must collect satellite data and establish your current location.
The time taken will vary depending on:
- how long it’s been since you last used it
- how far you are from the location where you last used it
- whether you have a clear view of the sky
When switched on daily, it should take a minute or less.
On 1st use, or if not used for a month-plus, it may take 3-5 minutes.
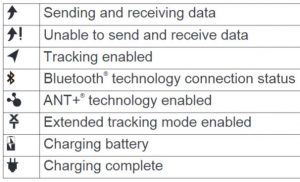
Test the reception
This may be done from a vehicle, at the foot of a tower or in the tower (for example).
With the unit turned on, note the symbols on-screen (as shown in the table below), particularly for sending and receiving data and unable to send and receive data.
Initiate an SOS rescue
Initiating an SOS rescue sends a message to the Garmin International Emergency Response Coordination Centre (IERCC). The Centre operator will notify the appropriate emergency responders of your situation.
Watch this video or read on.
You can communicate with the Garmin IERCC during your emergency while you wait for help to arrive.
You should only use the SOS function in a real emergency situation.
| Note: | While in SOS mode, the device cannot be turned off. |
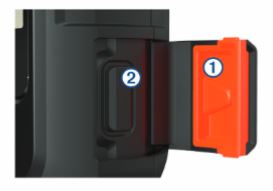
Step 1: Lift the orange protective cap (1) and press and hold the SOS button (2).
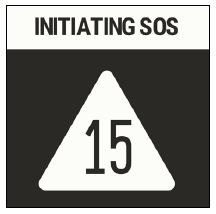
Step 2: Wait for the SOS countdown.
The device sends a default message to the emergency response service with details about your location.
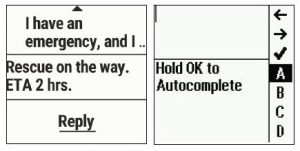
Step 3: Reply to the confirmation message from the emergency response service.
- Your reply tells the emergency response service that you are capable of interacting with them during the rescue.
- If you do not reply, the emergency response service will still initiate a rescue.
- For the first 10 minutes of your rescue, an updated location is sent to the emergency response service every minute.
- To conserve battery power after the first 10 minutes, an updated location is sent every 10 minutes when moving, and every 30 minutes when stationary.
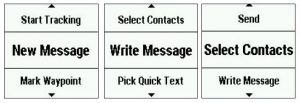
Send a custom SOS message
After pressing the SOS button to initiate an SOS rescue, you can reply with a custom message using the SOS page.
Step 1: Select Reply to compose a custom SOS message.
Step 2: When you have finished your message, select > Send
- Your reply lets the emergency response service know that you are capable of interacting with them during the rescue.
Cancel an SOS rescue
If you no longer need assistance, you can cancel an SOS rescue after it is sent to the emergency response service.
Step 1: Lift the protective cap, and hold the SOS button.
Step 2: Select Cancel SOS.
Step 3: When prompted to confirm your cancellation request, select Cancel SOS.

- Your device transmits the cancellation request.
- When you receive a confirmation message from the emergency response service, the device returns to normal operation.
IMPORTANT: Do not use your Garmin to send/receive messages!
| Caution: | Sending / receiving messages will incur significant charges. |