
- What is JourneyMate?
- How do I access JourneyMate?
- I don’t have a FireWeb ID – how do I get one?
- How to use JourneyMate (user guide)
- How to use JourneyMate (brief version)
- JourneyMate key concepts (activity and status)
- What actions can I complete using JourneyMate?
- Can someone else check-in for me using JourneyMate?
- Can I control who can see my Activity?
- ARI Guide: Setting up a multi-day Activity
What is JourneyMate?
JourneyMate is a web-based application that helps DEECA workers to:
- record a plan for a specific activity
- with agreed check-in times / schedule
- decide on the reminders and alerts (SMS, email) if a scheduled check-in is missed
- start an Activity; register individual check-ins; add Notes
- ultimately check-out (ending that Activity)
With JourneyMate, you can check-in/out via your:
- smart phone
- tablet
- computer
- Garmin and
- radio
- phone call to JCall
- or a combination of the above.
JourneyMate provides one central, standard way to help:
Workers
- assess the risk associated with the task
- set up regular, agreed check-in/out times (appropriate to that risk) with their Responsible Person(s)
- set up agreed escalation procedures if they miss those check-ins.
Responsible Persons
- help their employees with planning and managing their activity (including assessing risk and establishing check-in schedules, if required)
- monitor agreed check-ins/outs and escalate actions if they are missed
- define back-up plans should the nominated Responsible Person fail to respond in the agreed timeframes.
How do I access JourneyMate?
You will need a FireWeb acccount to access JourneyMate. Visit the FireWeb User Registration page to start the registration process.
JourneyMate is a web application (you do not need to download it in order to access it on your mobile phone).
- click this link: https://tarnook.ffm.vic.gov.au/safety/workingaloneisolation/
- enter your DEECA FireWeb username and password
When JourneyMate loads for the first time, ensure you select Allow when this pop-up appears. This allows the app to know your location.
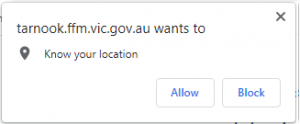
If you have selected Block or your browser’s Lat/Longs are not displaying correctly in JourneyMate, you will need to change your device’s settings to know your location. For instructions on how to do this, click here.
In addition, if accessing JourneyMate via the web on your phone, you may need to enable location settings in your iPhone/Android settings for the specific browser app you are using.
I don’t have a FireWeb account – how do I get one?
You will need your organisational SOE ID (e.g. JM8C) and your employee number.
Visit the FireWeb User Registration page and enter your work email address to start the registration process.
How to use JourneyMate (user guide)
JourneyMate User Guide – June 2022 (PDF)
How to use JourneyMate (brief version)
- Log-in to JourneyMate
- If prompted, click Allow – to let your app automatically convey your location/s to JourneyMate when checking-in / checking-out
- Complete
 – this is a one-off job
 - Record a
 activity and record the email address of the person who will perform it as the Staff in isolation
- If that person is you – fix any details (copied in to the Activity from ) as required
- If that person is someone else – record their details and (optionally) save them to that individual’s default profile
- If that person is you – fix any details (copied in to the Activity from
- When ready, that activity can be moved from Planned to Started by clicking
 (triggering automated notifications & escalations).
This can be done by anyone with JourneyMate access. - Check-in
 at your agreed times
- you can phone/radio your Responsible Person (or anyone with JourneyMate access) to do this for you in JourneyMate, or
- you can access JourneyMate on your smart phone and check-in , or
- you can read the SMS / email reminder JourneyMate sent to you and click the hyperlink, or
- you can – from your Garmin InReach Mini – press the 2 – Check-in button
- Optionally, add a
 at any time – add comments and/or record your lat/long
 - To plot more “dots” of your travels on the map – just check-in more frequently.
- When finished an activity, click
 (or from your Garmin InReach Mini – press the 3 – Check-out button).
This ends tracking and reminders and sets the activity to Status: Ended - Via the menu, click
 to access the entire history of all Activities ever recorded in JourneyMate. Both a Table and Map view are offered.
JourneyMate key concepts
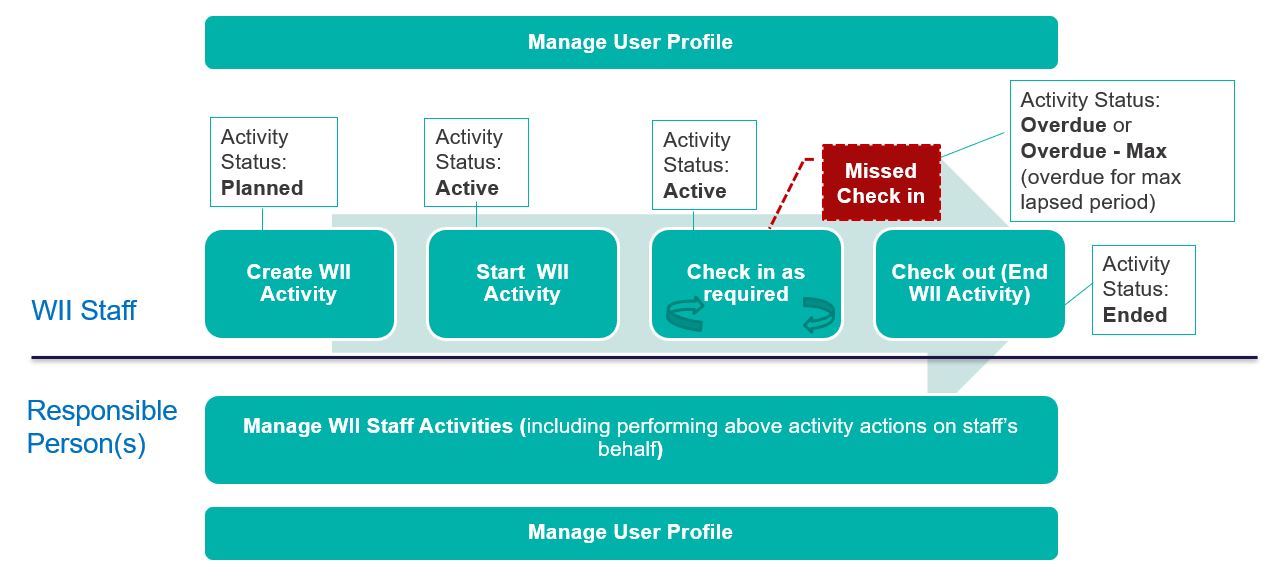
The central concepts of JourneyMate are planning, creating and managing (or completing) an activity, and monitoring the status of that activity.
ACTIVITY: An activity (or task) can have an Action carried out by a worker or by a Responsible Person on behalf of a worker.
Activity options include:
- record a New activity
- Start an Activity for the day (start)
- Check-in during that Activity to indicate I’m OK (check-in)
- End an Activity (check-out)
- Edit an Activity (e.g. change description of task; add another check-in time)
- Add a Note to an Activity (e.g. Job taking longer than I thought).
STATUS: Actions can also have a Status. Anyone with access to JourneyMate can view the Status of any activity.
Statuses include:
- Planned
 : the worker has created the activity in JourneyMate, but not yet commenced it
 - Active
 : a worker has started the activity
 - Active : the worker has checked-in as per the agreed schedule, confirming they’re OK
- Overdue: the worker is overdue for the agreed check-in; but remains within the agreed ‘tolerance’ time limit
- Overdue – Max
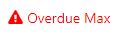 : the worker has missed the agreed check-in and exceeded the agreed ‘tolerance’ time limit (known as maximum lapsed time)
 - Ended
 : the worker has checked-out ~ ending that activity and notifying their Responsible Person(s)
The diagram below shows the possible actions, status and timing.
What actions can I complete using JourneyMate?
JourneyMate provides easy, fast and consistent recording of workers’ activities and their status.
This information is visible to Responsible Persons and others with access to JourneyMate.
Workers can:
- set up (and edit) their My Profile data, including defaults for their standard:
- Activity information
- Working Alone or in Isolation Activity Risk Rating
- contact details
- preferred contact method (e.g. I will check-in via radio)
- nominated Responsible Person(s)
Note: The My Profile info can be overridden at the Activity level if required – e.g. my ‘normal’ working alone or in isolation risk level is HIGH, but for this particular Activity (today) it’s LOW.
- start their Activity (signaling the commencement of safety monitoring)
- perform regular check-ins as defined by their Activity’s check-in frequency / schedule
- set their notification preferences, e.g.
- opt-in to receive a prompting reminder before their check-in is due
- acknowledge Activity actions when check-ins are sent
- receive overdue check-in reminders (no opting-out) on their smartphone &/or GPS device (if carrying one)
- check-out ~ signaling the end of the monitoring for that Activity.
Responsible Persons can:
- set up
- on behalf of their employee, including:
- contact details
- default (system-calculated) Working Alone or in Isolation Activity Risk Rating
- check-in frequencies or schedule
- timings for late notifications – for activities with Low, Medium or High risk levels
- saving those details – all, or selected ones – to update the employee’s Profile)
- preferences for receiving notifications
- opt-in to be notified when employee performs an Activity – e.g. each time they check-in / -out
- specify how they want to be notified – e.g. via email and/or SMS text
- on behalf of their employee, including:
Note: the My Profile information can be overridden at the Activity level if required
- start an Activity on their employee’s behalf
- when an Activity has started:
- receive notifications of overdue check-ins ~ so they can be followed up, if necessary
- record their employee’s check-in (e.g. “Suzie called in via Tait Portable Radio”).
- via the JourneyMate dashboard:
- view their employee(s) Activity(s), with ability to filter (e.g. only display Active activities)
- drill-down to view the full history of an Activity – including:
-
- time the Activity started
- times and locations (lat/longs) of each check-in, and who logged them
- time the Activity ended
Can someone else check-in / check-out for me using JourneyMate?
Yes. Anyone with JourneyMate access can register a check-in or check-out on your behalf, so that we know you are safe.
This is done via the JourneyMate app dashboard.
If you share a Garmin inReach Mini unit among many team members, then the one contact (IMIE) number will be recorded against many Planned activities, and there may be confusion re. which Activity pressing Start on your Garmin is to be started. In this instance, it’s safest to get someone to Start the specific activity using the JourneyMate app (not the Garmin unit).
Your details will be recorded as having logged that action on the worker’s behalf, ensuring an accurate record of who did what and when.
Can I control who can see my Activity?
As of July 2022 – Yes.
As an example: you’re going out to inspect the condition of an example of indigenous rock art – and you don’t want all JourneyMate users being able to view the location of that site by seeing your check-ins on the map …
Sensitivity Options have been added at the bottom of the New Activity dialog.
Note: JourneyMate deliberately forces you to set these per Activity – you cannot set them as part of a Profile.
Let’s say the person performing this Activity is Sue – a DEECA employee based at the Heidelberg ARI work centre.
Sue can can choose to limit visibility of her Activity to people from her:
- Work Centre ~ e.g. people based at Heidelberg ARI – and/or
2. Agency ~ e.g. DEECA employees
and/or
3. a nominated list of Direct Users: ~ e.g. tony.trapani@parks.vic.gov.au and kelly.rash@deeca.vic.gov.au
Note that each rules applies: even if they contradict one another.
In the example above, that Activity is visible to:
- everyone based at Heidelberg ARI (regardless of Agency), and
- every DEECA employee (regardless of Work Centre), and
- Tony Trapani (from Parks Vic)
Specifying Kelly Rash in rule 3. Direct users is redundant ~ she’s a DEECA employee, so she can view under rule 2. Agency anyway
Note: the State Duty Officer retains visibility of all activities – regardless of any Sensitivity options you set – to ensure all employees’ safety is accounted for.
ARI Guide: Setting up a multi-day Activity
Note: thanks to Steve Wernert (Arthur Rylah Institute) for providing the following guide on how to set up an Activity that can run across multiple days. Originally written for ARI staff, the technique will work for anyone wanting one Activity to span multiple days. Great work Steve.
This Guidance covers setting up JourneyMate check-ins for multi-day field trips – it will ensure you check-in twice per day, for each day in the trip until you Check-out .
It is vital to follow this 2-step process[1]. Failing to do so will mean the trip leader and the Duty Officer (Responsible Person) will receive automated check-in reminders every 2 or 2½ hours.
This diagram will help you understand how this works.

This process assumes that each day repeats the same set of scheduled times. For this example, we have used 6:00 PM and 8:00 AM.
You can follow this process by setting up your Profile ![]() – or by setting up a
– or by setting up a ![]() Activity.
Activity.
If you set up your Profile ![]() , check those settings carry through to each
, check those settings carry through to each ![]() Activity you create (based on that Profile).
Activity you create (based on that Profile).
Step 1 Of 2: Setting The Time Between Check-Ins On Consecutive Days
› Run JourneyMate.
› Under Check-In Schedule for a new Activity > Check-in interval (in minutes), enter a number of minutes greater than your overnight break plus at least a 60 minute buffer.
For example – for 6:00 PM to 8:00 AM = 14 hours = 840 minutes + 60 minute buffer = 900
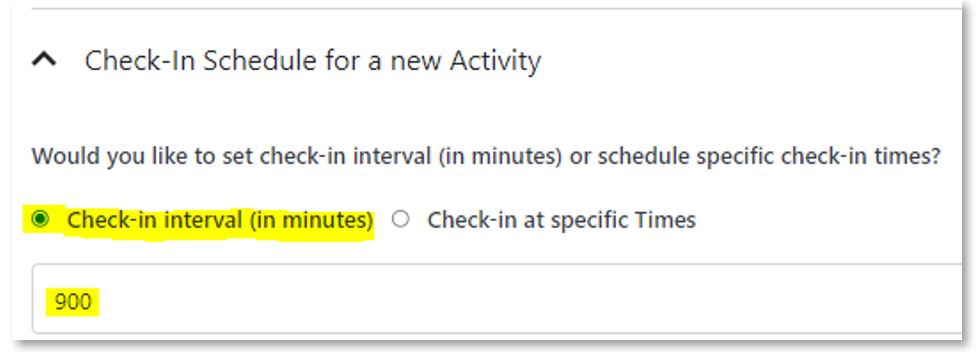
› Click the green  button.
› Click the Activity’s hyperlink to return to it
Step 2 Of 2: Setting Up Times you will Check-in
› Under Check-In Schedule for a new Activity > this time, select Check‑in at specific Times
› Enter the daily schedule – we suggest entering your end of day check-in time first – then the following day’s start check-in time – see example below:
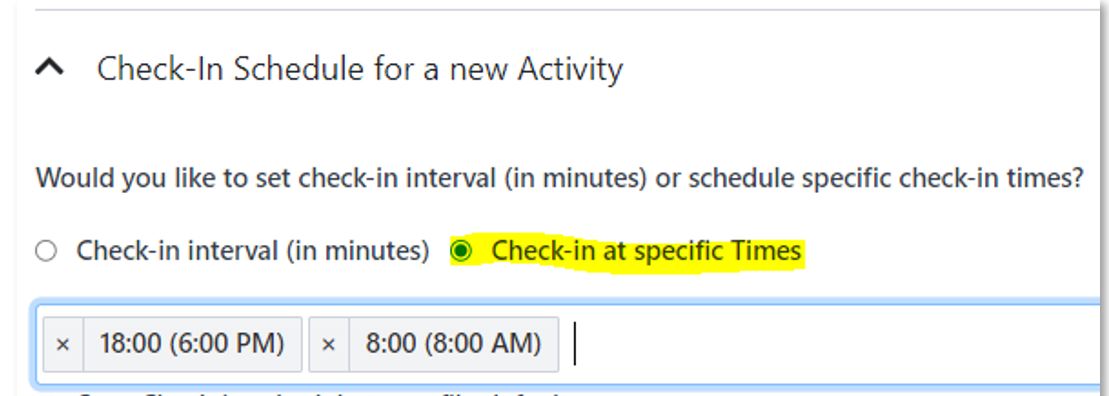
› Click the green button.
In Step 2, you said you’d check-in at 18:00 (6:00 PM) then 8:00 (8:00 AM) the following day.
In Step 1, the Check‑in interval of 900 minutes says to JourneyMate …
After the 6:00 PM check-in, see if there is a Check‑in at specific Times value, that falls into the 6:00 PM to
(6:00 PM + 900 minutes (15 hrs) equals…) 9:00 AM period – and if there is, then use it.
Since your 8:00 AM time falls in that range, the reminder for you to check-in is activated – and you get a reminder.
If you check‑in more than an hour early, you should increase your Check‑in interval value accordingly.
Combining Steps 1 and 2 means you can use the one Activity to check-in over multiple days.
You will know this method has been successful when, after your evening check-in, the Next Check In: time will be shown as your morning check-in time …
Remember to Check Out  at the end of your trip (which completes that Activity)!
[1] The alternative is to set up a new activity for each day you are in the field.